Category Archives: Chimney

Fireplace Dampers – Throat Dampers vs Top-Mount Dampers

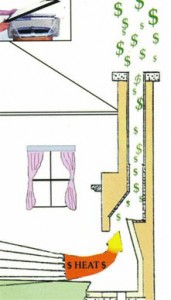
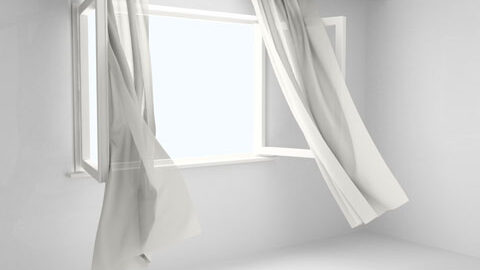
An open damper is like an open windowFireplace dampers are an important component of your fireplace system and are often overlooked. Dampers serve the critical purpose of closing off the chimney when the fireplace is not in use. It’s an energy efficiency device, saving you money by preventing the loss of heat during the winter and preventing the loss of air conditioning during the summer. An open or missing damper is like an open window.

What is a Fireplace Damper?

In simple terms, a damper is a metal plate that closes the chimney flue. Homeowners often get the terms “damper” and “flue” mixed up. They’re very different but they work together. Simply stated, the damper is a metal plate; the flue is the pipe.

What is a Throat Damper?

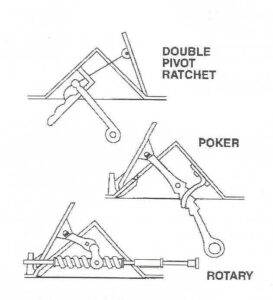
Dampers come in different types and styles. Most dampers that are part of the original construction are called “throat dampers” because they’re located in the throat of the fireplace, above the firebox (where you make the fire) and below the smoke chamber and flue pipe. Throat dampers come in various styles–pivot hatchets, poker, rotary, spiral, vestal, Allied/Donley, and Majestic.

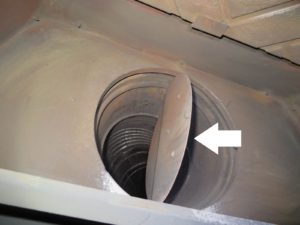
Examples of Throat Dampers        Photo credit: Chimney Safety Institute of America

Different regions of the country have different kinds of dampers. Another interesting point is that many dampers on the East Coast are removable and replaceable. This makes it much easier for chimney sweeps to be able to do a thorough cleaning of the system, especially into the smoke shelf behind the damper, because they don’t have to fight around the damper plate.

Here in San Diego and most of the West Coast, dampers are not removable and replaceable. That means that once the damper is damaged beyond repair, the damper cannot be replaced in the throat of the chimney without tearing open the facade which would be cost-prohibitive. In that case, there’s another solution–a top-mount damper.

What is a Top-Mount Damper?

If a throat damper becomes damaged beyond repair and cannot be replaced, our industry has created a solution called a Top-Mount Damper, also known as a Top-Sealing Damper.

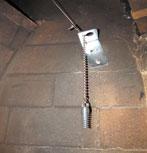
A bracket for a top sealing damper
The bracket that holds the chain on a top-mount damper

This damper is placed at the top of the chimney stack. Most of these types of dampers are operated by a cable that runs all the way down the flue pipe and into a bracket inside the firebox. To close the damper, you simply pull the chain down and lock it in the bracket. To open the damper, you unhook the cable from the bracket and it pops open at the top because it’s spring-activated.

Top-mount dampers come in different styles. Some of the top-mount dampers are referred to as “Ice breakers,” to be used in colder regions.

Heat loss from a chimney without a damper
Without a damper
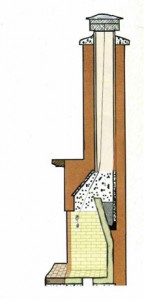
A chimney with a top sealing damper
With a top-mount damper

Four advantages to Top-Mount Dampers:

* Top-Mount Dampers seal better which will save you money on utility bills. When the cable is pulled down, the damper plate seals against a rubber, silicone or rope gasket which gives it a tight seal. Throat dampers, on the other hand, never provide a complete seal, especially as they get older and the damper plate warps. Without the seal, there are gaps that allow heat loss during the winter. Top-mount dampers will increase energy efficiency in your home and save you money in heating during the winter and air conditioning during the summer.

* For cold climate areas, the top-mount dampers keep the warm air inside the flue, helping the draft and reducing the likelihood of smoke coming into the room.

* If you don’t have a chimney cap, rodents and birds can come down the chimney and enter the house. The top-mount damper closes the chimney at the top, making it impossible for critters to get in.

* Here in San Diego and other parts of Southern California, we have a serious problem with aggressive Africanized Bees. Bees like to build their hives in chimneys. With a typical throat damper, the bees have free access to build their hive in the flue. A chimney cap isn’t enough to prevent the bees from entering the flue. With a top-mount damper, the flue is completely closed off at the top, making it almost impossible for bees to enter the flue.

One caveat…

Top-mount dampers can only be installed on masonry chimneys with open fireplaces. They cannot be installed in prefab fireplaces, free-standing stoves or Rampart General Pre-Cast systems due to the U.L. listing. The top-mount dampers also cannot be installed with windcaps.

In addition, top-mount dampers cannot be installed for a fireplace that has artificial gas logs or a log lighter because the damper must be locked fully open.

If you need your existing throat damper repaired or you’re in the market for a top-mount damper, contact a CSIA Certified Chimney Sweep.

Three Reasons NEVER To Remove A Fireplace Lintel

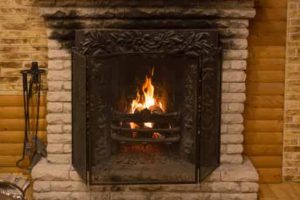
FireplaceAs professional chimney sweeps, there’s a common issue that we’ve been running into more and more during the past few years.

Contractors, interior designers, and do-it-yourself homeowners are removing the fireplace lintel. Perhaps this is to create, in their minds, a more aesthetically-pleasing fireplace by making a taller firebox opening. However, removing the lintel can create some major issues for the fireplace.

Many times, the removal of the lintel isn’t discovered until the homeowner calls a trained chimney professional to do a chimney sweeping or when a home inspector discovers it in the middle of escrow during a home inspection.

What Is A Fireplace Lintel?

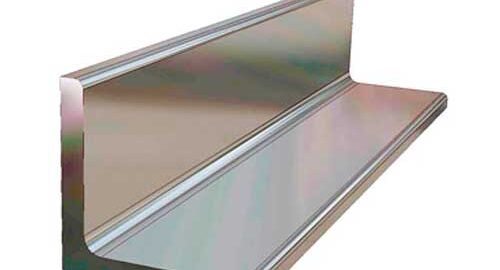
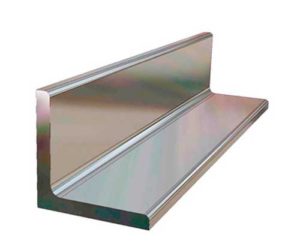
Fireplace Lintel Bar
Photo Credit RCP Block & Brick

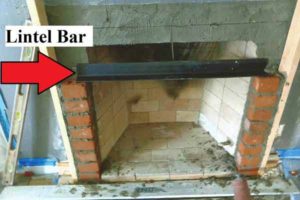
The fireplace lintel is typically a metal L-shaped bar or a flat steel beam that supports the bricks and masonry above the firebox opening. The lintel runs the full width of the firebox opening and, by code, extends into each side by at least four inches. The purpose of the lintel is to support the masonry above the fireplace opening.

According to California Residential Code R1001.7 – Lintel and throat: “Masonry over a fireplace opening shall be supported by a lintel of noncombustible material. The minimum required bearing length on each end of the fireplace opening shall be four inches. The fireplace throat or damper shall be located not less than eight inches above the lintel.”

Keep in mind that this code pertains to San Diego and may be different in other parts of the state and country. You will need to check with your local jurisdiction to see what the code requirements are in your area.

There are three important reasons why a fireplace lintel should never be removed.

Structural Issues

The purpose of the fireplace lintel is to serve as structural support for the area above the firebox opening.

Mortar joints between bricks can deteriorate over time and become like sand or dust.

The vibration of power tools used in power chimney sweeping may collapse already loosened bricks above the firebox opening. This creates a potentially dangerous situation for a chimney sweep who may be inside the firebox when the bricks above the firebox crash down.

In addition, without a lintel, the firebox opening can collapse during an earthquake.

Safety Issues

With or without heat exposure, cracks may develop in concealed areas that can allow heat and combustion byproducts to travel outside the fireplace during use. This may expose adjacent combustibles to excessive heat.

Heat exposure from fireplace use may cause or accelerate crack formation in the now unsupported masonry above the firebox.

Smoking Issues

The most common reason for removing a fireplace lintel is to make the firebox taller. However, fireboxes that are taller than they are wide are more prone to smoking problems.

A masonry chimney is built to a very specific formula. In simplistic terms, the formula has to do with the height and width of the firebox opening, the height of the chimney and the diameter of the flue pipe, among other specifications. If any of those are changed, your fireplace will be more prone to smoking problems. Making the firebox taller will likely affect the performance of the chimney.

Installing A Fireplace Lintel

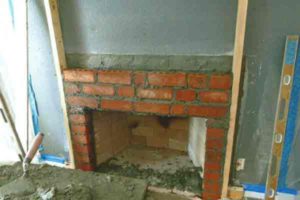
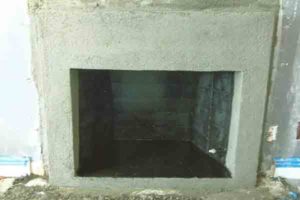
Here are photos showing how a fireplace lintel is installed.

Fireplace Lintel

Fireplace Lintel


Before remodeling your fireplace, including a new facade, have your chimney inspected by a CSIA Certified Chimney Sweep. He or she will be able to inform you of the local building codes in your area for specifications on the fireplace lintel.

[Photo Credits: Jim Crawford of Authentic Fireplace Services unless otherwise stated]

Frequently Asked Questions about Prefab Fireplaces

What is a prefab fireplace?
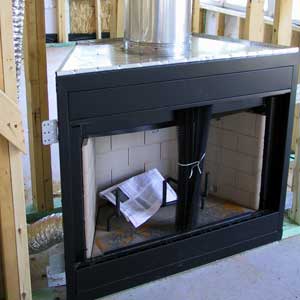
A prefabricated fireplace goes by several names–a “prefab” or “factory-built fireplace.” Another term would be “decorative heating appliance.”

These fireplace systems are manufactured in a factory, assembled at the customer’s home and installed into the wood framing of the chimney structure.

This type of fireplace is tested to the U.L. 127 Standard in the Underwriters Laboratory or other approved agency. This approval is called a “listing.”

The system is comprised of a metal firebox with either refractory panels or metal panels, a metal pipe, a metal chase cover, and a chimney cap, all housed in a chimney structure. Outside the home and above the roofline, the chimney structure (also referred to as a “chase”) is nothing more than wood framing and stucco. The metal pipe is inside the chase. In some cases, the pipe will be exposed above the roof.

Here in San Diego, prefab fireplaces have been around since the late 1960s or early 1970s. Because of the high cost of labor for building masonry fireplaces, contractors started installing prefabricated fireplace systems. Most tract homes built since the 1980s have prefab fireplaces.

Home builders and contractors make a prefab fireplace look like a masonry fireplace. Most homeowners cannot tell the difference and don’t even realize that it’s not a masonry fireplace.

What is a U.L. listing and why is that important?

The manufacturer goes through expensive and extensive testing through the Underwriters Laboratory or other approved agency. The approval, or “listing,” involves testing the system with the specific components of the system.

This is important to know because if any of the components are changed out with a component not tested with the system, it voids out the listing on the entire system. That means that if there’s ever damage caused by the fireplace due to a non-manufacturer’s component, the liability is removed from the manufacturer. The fireplace professional who installed the non-manufacturer’s part may then be held liable.

For safety and liability reasons, these prefab fireplace systems should not be modified against the manufacturer’s specifications!

What is the difference between a prefab fireplace and a masonry fireplace?

There’s a big difference between these two types of fireplace systems.

A masonry system is built on-site, brick by brick. These are well-built systems made with bricks and mortar. Masonry fireplace systems built after the 1940s also have a pipe known as a flue lining.

Here in San Diego, the pipe in masonry chimneys is typically made from terra cotta (clay) or pumice. If masonry chimneys are maintained properly, they can last more than a hundred years.

How can I tell if I have a prefab fireplace?
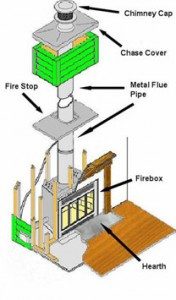
A graphic of what a prefab fireplace is, listing all the parts to the systemThe exterior chimney structure is typically made of stucco or siding. A masonry chimney will usually have bricks and mortar.

The flue pipe in a prefab is made from metal, either a double wall or triple wall pipe. Looking from the prefab firebox up into the flue, the smooth metal pipe can be seen.

The average homeowner cannot tell if they have a masonry or prefab fireplace. A qualified chimney professional trained in prefab fireplaces or a CSIA Certified Chimney Sweep will be able to inform the homeowner what type of system it is.

How can I know what the manufacturer and model are of my prefab fireplace?
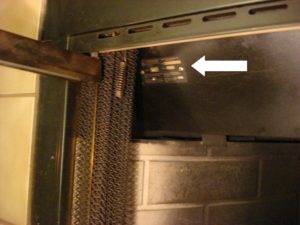
The tag which lists the manufacturer and model of a prefab fireplacePrefab fireplaces will have what we refer to as a “tag.” This is a metal plate, sometimes the size of a business card, and it will be placed somewhere inside the firebox. The tag will list the name of the manufacturer and the model number.The tag which lists the manufacturer and model of a prefab fireplace
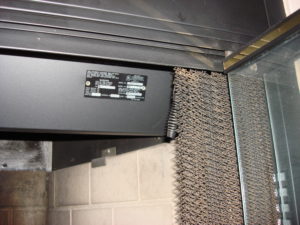
In new homes, the contractor may have left the operating/installation instructions for the new homeowner that will list the manufacturer and model number. Homeowners should keep track of this important information.

How do I use my prefab fireplace?

Most prefab fireplaces can be used with artificial gas logs, prefabricated logs (such as Duraflames) or well-seasoned wood. Reading the operating instructions is helpful for homeowners to know how to safely operate their fireplace.

Also, prefab fireplaces cannot have big fires or very hot fires in them. If you do, you can crack the fragile refractory panels inside the firebox and those panels can be very expensive to replace. For that reason, we recommend that prefab fireplaces should be limited to small fires. Certainly, you can burn wood in most prefabs but never any larger or hotter than what you would get if you’re burning just one Duraflame log.

What is a refractory panel?
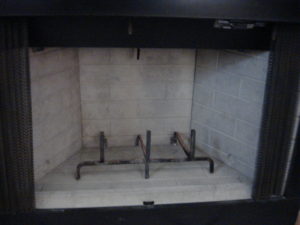
Refractory panels inside a prefab fireplaceIn most prefab fireboxes, the systems will have four refractory panels–two sides, a back, and the floor–inside the firebox where you make the fire. These panels stand up about two feet tall. They are made from refractory cement, stamped to look like bricks but they’re not really bricks.

These panels protect the metal firebox by lowering the temperature to the metal. Behind the metal firebox is the wooden structure of the chimney chase.

Without refractory panels or with damaged panels, too much heat can get to the metal firebox behind the panels.  This can then heat the wood framing behind the firebox. In addition, if the metal firebox gets too hot, the metal firebox may warp and new refractory panels will no longer fit.

Burning too hot of a fire will crack the refractory panels.
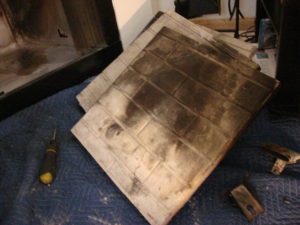
Burned out and cracked refractory panelsUsually, the back and floor panels get cracked first because they get most of the heat of the fire. Hairline cracks should be monitored. The panels must be replaced if any cracks are wider than what you could fit the edge of a dime into.

Cracks in the refractory panels cause a potentially dangerous situation since they have lost their insulating ability and may allow the transfer of heat to combustible materials.

Most manufacturers state that if there are cracks in the panels, the panels cannot be repaired or patched. The panels have to be replaced.

These refractory panels are the Achilles Heel of the system but with proper usage, by not having large fires, you can prevent cracks from occurring. Cracked refractory panels should only be replaced with manufacturer’s panels. Using after-market parts (also known as “universal panels” or “non-factory parts” or “cut-to-fit panels”) may void out the U.L. listing on the prefab system.

Remember, these systems are not intended for heating your home. Only ambiance. In fact, if you’re getting a lot of heat out of your prefab fireplace, then you’re probably having too large of a fire.

What is a chase cover?
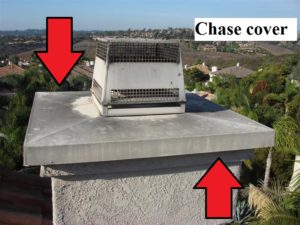
A chase cover on a prefab fireplaceThe chase cover sits on top of the chase (chimney structure). It is a flat, horizontal piece of sheet metal that sits on top of the chimney structure. The chase cover has a large hole in it where the pipe comes through the cover and attaches to the chimney cap.

It’s not uncommon for chase covers to rust when rainwater pools on top of the cover. The rust eats through the metal chase cover, creating a hole. Rainwater can then enter the chase, landing on top of the firebox which will rust out the entire system. At that point in time, the entire system will need to be replaced.

Why do I hear water dripping when it rains?

When you hear water dripping on metal, call a chimney professional immediately. That sound is likely where water is coming through a rusted-out chase cover. If you wait too long, the water landing on the firebox inside the chase will rust out the system, creating a very expensive replacement of the entire prefab system.

Having the prefab fireplace inspected on an annual basis by a qualified chimney professional will prevent this issue, ultimately saving you money by fixing the problems before damage occurs.

What are the common problems with prefab fireplaces?

The most common problems we see with prefab fireplaces are cracked refractory panels, leaking chase covers, rusted out fireboxes and rusted out caps.

Preventing these issues is easy by having smaller fires and having your chimney inspected on an annual basis by a qualified chimney professional to prevent problems before they happen.

I don’t use my fireplace. Do I still have to have it inspected every year?

A prefab fireplace that is never used can still deteriorate.

We find that here, in San Diego County, prefab fireplaces in homes near the ocean deteriorate much faster than in other areas of the county. The salt air from the ocean, even as much as 5-10 miles inland, can rust out a prefab fireplace. The lifespan of a prefab fireplace can be cut in half because of its proximity to the ocean.

This makes it even more critical to have a prefab chimney inspected on an annual basis to catch problems with the system before the problem gets too extensive and the entire system has to be replaced.

Where can I find parts for my prefab fireplace?

Most manufacturers of prefab fireplaces only sell parts to chimney professionals and not directly to homeowners. After determining the manufacturer and model of the system, a chimney professional can contact the manufacturer for replacement parts such as refractory panels, fireplace glass doors, and chimney caps. Installing components that are not from the manufacturer will void out the listing on the system and, in the event of fire damage caused by the fireplace, it can create liability issues because the installer modified the system against the manufacturer’s specification and the listing.

How long do prefab fireplaces last?

There’s a wide variation of professional opinions on how long prefab fireplaces last.

Certain factors can decrease the life span, such as not maintaining the system, the proximity to the ocean, weather conditions or over-firing the system. Having the prefab system inspected on an annual basis, whether the system is or isn’t used, is the best way to extend the life span of a prefab fireplace.
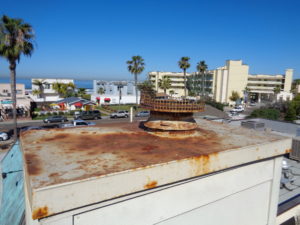
A rusted-out chase cover on a prefab fireplaceMany manufacturers and chimney professionals will say that prefab fireplaces can last between 20-30 years. In our professional experience, here in San Diego, we’ve seen some systems needing replacement after only 15 years while at the same time, we’ve seen well-maintained systems that are over 40 years old and still operational.

How do I replace my prefab fireplace?

Replacing a prefab fireplace is not something the average homeowner should attempt. In fact, we advise only a licensed chimney professional specifically trained in prefabs should replace the system. If a prefab fireplace is not installed properly, it can create an extremely dangerous and deadly situation for the homeowner.

When a prefab fireplace needs to be replaced, the existing chimney chase (the chimney structure) can still be used. Only the “innards” of the prefab system need to be replaced–firebox, flue pipe, chase cover, and cap.

Unfortunately, the firebox opening for the new system won’t necessarily be the same size opening as the old system which means that the facade may be affected around the firebox opening.

In most cases, the facade must be removed first so that the prefab system can be removed and replaced. For this reason, we recommend that the prefab fireplace be replaced at the same time as updating the facade.

Can I burn gas logs in my prefab fireplace?

The best way to know what you can and cannot burn in your prefab fireplace is to read the manufacturer’s operating instructions for your specific manufacturer and model of your system. In most cases, you can burn wood, prefabricated logs (such as Duraflame logs) or artificial gas logs.

Sometimes the tag will also indicate what types of fuel can be burned.

Glass doors open or glass doors closed?

Glass doors must be in a fully OPEN position when you have a fire in the fireplace.

If glass doors are partially open, the gases and smoke may be drawn into the room through a “secondary chimney effect” so keep the doors fully open.

If you close the glass doors while you have an active fire, the glass can implode or explode.  Here’s a youtube video from Kelly Ripa, a morning talk show host, whose glass doors exploded on her because they had the doors closed:

http://https://www.youtube.com/watch?v=7R7IvsZ0ALc

Of course, before you go to bed at night, once the fire has died down, close the glass doors.  This will prevent embers from coming into the room while you’re sleeping.

Glass doors serve the purpose of preventing heat loss from your home especially when you have your damper locked open as in the case of artificial gas logs. Unfortunately, in some cases, glass doors are no longer available, especially in a case where you have an older prefab fireplace.  In that case, do not put on any glass doors other than the doors specifically listed for the manufacturer and model of your prefab system.  IMPORTANT: Putting on any other glass doors may block the air-cooling louvers and overheat the system.

How can I remodel my prefab fireplace?

We are finding that many homeowners who remodel the fireplace by installing a new facade don’t realize that the prefab fireplace may already be at the end of its life span. These facades can be very expensive.

When the prefab fireplace has to be replaced, the facade may have to be removed. For that reason, we recommend timing the remodel of a new facade at the same time that a new prefab fireplace is installed.

First things first, always have your prefab fireplace inspected and maintained by a CSIA Certified Chimney Sweep on an annual basis so you can safely enjoy your fireplace and get the most amount of life span out of your system.


Special thanks to Pat and Bernie Lopez of Burnie’s Fireplace Services, nationally-renowned experts in factory-built fireplaces, for their valuable input in this blog post.
A Wind Cap vs A Chimney Cap

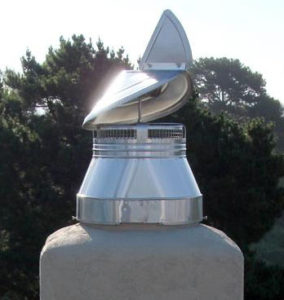
Wind cap
A Wind Cap

Enjoying a warm fire on a cold evening is one of the simple pleasures in life, but not when that beautiful crackling fire is accompanied by the eye-burning smell of smoke.

There are a number of causes for fireplace smoking problems, many of which are easily remedied.

If you live in areas prone to wind, such as the coastal or mountain region, or even off of a canyon or hillside, there is a very simple solution–a chimney wind cap.


The difference between a Wind Cap and a standard Chimney Cap

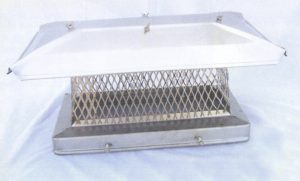
Chimney cap
A Standard Chimney Cap

A standard chimney cap serves several important purposes:
* Prevents embers from landing on the roof;
* Prevents animals and other critters from entering the home through the chimney;
* Prevents rain from going into the chimney system; and
* Prevents debris, leaves and pine needles from entering the chimney.

A standard cap, however, will not prevent wind-induced downdrafts.

What is a Wind Cap?

Wind caps have the same benefits as standard chimney caps but due to the design, wind caps have the added benefit of preventing wind from going down the flue which can cause smoking problems in your home.

Wind caps work on the same premise as weather vanes.  They rotate on a turret, turning their back to the wind while allowing the smoke to exit the flue pipe. The wind currents flow over the cap, instead of going down the pipe. The air current going past the wind cap creates a venturi effect (partial vacuum) in the pipe, helping to prevent the downdraft that creates the smoking problem. The hood of the wind cap also prevents horizontal rain from entering the flue pipe.

Where to find a Wind Cap

Unlike universal standard chimney caps, wind caps must be custom sized to fit the flue pipe. This requires taking accurate measurements of the inside and outside diameter of the flue pipe as well as the shape of the chimney flue pipe. The measurements can be tricky, especially for the odd-sized or odd-shaped flue pipe. Wind caps have to be special ordered to fit properly. It is recommended to hire a professional chimney sweep to measure, order and install a wind cap. To find a CSIA Certified Chimney Sweep, go to the Chimney Safety Institute of America’s website.

One precaution with a wind cap

Please be aware that a wind cap cannot be installed on a pre-fabricated fireplace system due to the U.L. listing on the pre-fab fireplace. A wind cap can be installed on a masonry chimney and the pipe of some freestanding wood stoves and stove inserts.


Fireplace smoking problems may be easily resolved. Don’t just accept a fireplace smoking problem. Nothing should take you away from enjoying one of the simple pleasures in life.

Levels of Chimney Inspections

A microscope on top of a cut-out house with the focus on the chimney

In 2000, the National Fire Protection Agency, otherwise known as NFPA, addressed chimney inspections. The NFPA established three levels of inspection–Level 1, Level 2 and Level 3. This three-tiered system of chimney inspections can be confusing to homeowners, real estate agents, and even home inspectors. This is a brief explanation to clarify this important subject.

Home inspections

Home inspectors perform an inspection on most all of the systems in a home. However, they will be the first ones to say that they cannot thoroughly inspect a chimney because they can only inspect what they can see.

Home inspectors can inspect the firebox (where you make the fire) and they can inspect the top of the chimney (if they get on a roof), but home inspectors cannot inspect the most critical part of the chimney system–the flue lining.

Most chimneys built after the 1940s have a flue lining. For the most part, this lining is made out of terra cotta (clay), pumice or, currently, the lining is made out of metal. If this lining is damaged or non-existent, the chimney can no longer be used.

Chimneys constructed without linings are called “Unlined Chimneys.” According to the Chimney Safety Institute of America, they specifically say: “Never use a chimney that does not have a liner or has a damaged or improper lining.”

If a chimney is dirty, it’s absolutely impossible to inspect the chimney. There is no possible way to see through a thick layer of creosote build-up to inspect the flue lining for cracks or missing mortar joints. In this case, the chimney must be swept first before doing any inspection. Home inspectors don’t sweep chimneys which is yet another reason why home inspectors cannot completely inspect the chimney.

For this reason, most home inspectors and real estate professionals will recommend a more thorough chimney inspection be done by a CSIA Certified Chimney Sweep.

The difference between the levels of inspection varies between how in-depth the inspection is, which areas are to be inspected, what types of tools are used to access various parts of the chimney and to what degree of invasiveness. Here is a quick breakdown of the Levels of Chimney Inspections:

Level 1 Chimney Inspections

This is a typical inspection done annually as part of routine chimney maintenance. In most situations where there have been no changes in usage or fuel type during the recent past or there have been no major performance problems, then Level 1 Chimney Inspections are sufficient. Inspecting the top of the chimney from the roof or ladder is not part of Level 1 Chimney Inspections. We also make sure that the proper clearances to combustibles are within code in accessible locations.

Level 2 Chimney Inspections

This level of inspection is recommended for:
* When there has been a change of fuel type (such as going from wood burning to gas log burning)
* When relining a chimney or installing an appliance such as a stove insert
* Upon sale or transfer of the property during a real estate transaction
* After a malfunction or chimney fire event
* After an external event such as an earthquake or major weather event

Level 2 chimney inspections are much more in-depth than Level 1 chimney inspections. Most chimney professionals will use a video camera to see all parts of the flue lining. These video inspections will allow us to see aspects of the chimney that Level 1 chimney inspections cannot. Specifically, we’re looking for cracks in the flue lining or missing mortar joints between the flue tiles. In addition to the video scans of the flue lining, these Level 2 Chimney Inspections also may include accessible portions of the chimney’s exterior, as well as attics, crawl spaces and basements.

If a chimney has not been used in a long time, it’s common to have spider webs. In this case, these spider webs will show up as cracks during a Level 2 inspection with a video scan. The spider webs can sometimes give us a false reading and may show cracks when there are no cracks. For that reason, we likely will recommend a chimney sweeping as part of Level 2 chimney inspections.

Level 3 Chimney Inspections

Level 3 Chimney Inspections are rare and are recommended only when Level 1 or Level 2 chimney inspections are not sufficient to determine the serviceability of the chimney. These Level 3 chimney inspections include all aspects of Level 1 and Level 2 chimney inspections but may also include dismantling parts of the system or cutting into walls in order to gain access for areas of the chimney not accessible by other methods.


This NFPA standard, with the three Levels of Inspection, is for the benefit of the homeowner. A CSIA Certified Chimney Sweep will be able to determine and recommend which level of chimney inspection is needed for the situation.

And remember, the National Fire Protection Association and the Chimney Safety Institute of America recommend that all chimneys be inspected annually and swept if necessary. To find a qualified CSIA Certified chimney professional in your area, be sure to go through the Chimney Safety Institute of America.

Here is further information on the Levels of Inspection. [Video credit: Chimney Safety Institute of America]

An open fireplace damper is like an open window

Money flying out of walletDuring these dog days of summer, many homeowners are making a very expensive mistake. Here in San Diego, homeowners are opening their SDG&E envelopes and getting sticker shock with astronomically high utility bills. What homeowners don’t realize is that by making a very simple change, they can save a great deal of money.
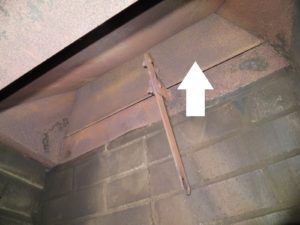
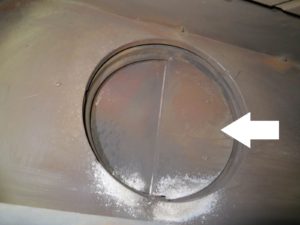
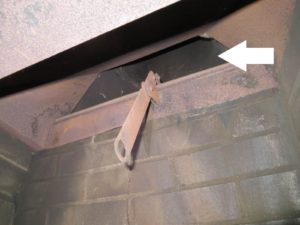
 

So here’s the tip: CLOSE YOUR FIREPLACE DAMPER!

What is a flue and what is a damper?

These terms are not interchangeable.

The flue is the vent pipe that allows gases, smoke, and heat to exhaust out of the home. The damper is a metal plate that opens and closes off the flue. When the fireplace is not in use, the damper should be closed in order to close off the flue.

Dampers are typically located at the bottom of the flue pipe, just above the firebox in the throat of the system.

Dampers typically have a rod or handle that you can push forward or backward. Other dampers move side to side, while others pull down or push up. It all depends on the type of fireplace you have.

In some cases, dampers can be located at the very top of the flue pipe with a chain that comes down and hooks in a bracket inside the firebox. These are called “top-mount” dampers. To close these dampers, you pull the chain down and hook it in the bracket. To open, you unhook the chain from the bracket and the damper plate pops open at the top because it’s spring activated.

Not all fireplaces have dampers but most do.

Why it’s important to close dampers

Here in San Diego, because our weather is typically very mild, many homeowners leave their dampers open all the time, not realizing that by doing so, their air conditioner is working overtime, costing the homeowner unnecessary money.

When the air conditioner is on and the damper is open, hot air from the outside is being drawn down the chimney and into the room. You’re actually sucking the hot air into your house. It totally defeats the whole purpose of using your air conditioner. In addition, if your chimney is dirty, you’re also sucking particulates of soot, which is a carcinogen, into the home. This is another reason to keep your chimney clean and your damper closed when the chimney is not in use.

It’s not just summertime that open dampers create problems. During winter time, when it’s cold outside, if your damper is open and you turn on your furnace, all you’re doing is sucking cold air into the home. This totally defeats the whole purpose of having your furnace turned on. So keep the damper closed during the winter time when you’re not using your fireplace.

How to tell if dampers are open

It’s not always easy to tell if your damper is open or closed. In fact, this is the #1 question when homeowners call me about their chimney. Unfortunately, because dampers open differently based on what type of system you have, I can’t give a conclusive answer over the phone. Here are several ways to tell if your throat damper is open or closed:

1) It’s actually easier to tell during the daytime than at night. One way you’re going to see more light from the sun than the other way. Keep in mind that because chimneys are not built straight up and down, you’ll rarely ever be able to see blue sky but one way you’ll be able to see more light than the other.

2) With a flashlight, look up from the firebox into the flue pipe. You should be able to see the metal damper plate in the throat of the system. When it’s open, you’ll actually feel more air movement than when it’s closed.

3) Light a match and blow it out. Immediately place the match close to the damper. The smoke from the blown-out match will indicate if the damper is open or closed.

4) Of course, there’s always the method that many homeowners use. Light the fire on a wing and a prayer. If it smokes out your house, then you know your damper is closed. We do not recommend this method due to the smoke damage to your home and to your lungs!

Here are examples of open and closed dampers.  This is looking from the firebox (where you make the fire) up the flue pipe:

Closed damper for masonry
Closed Damper for Masonry Chimney
Closed Damper for Pre-Fab Chimney
Open Damper for Masonry chimney
Open Damper for Masonry Chimney
Open Damper for Prefab Chimney

An Important Tip to Remember about Dampers

It’s not easy to remember, from season to season, which way the damper is open and which way is closed. To help me, I made a label and stuck it to the underside of the mantle which tells me which way to open. If I forget, I know where to look to find out easily.  Here’s the label I had on the underside of my own mantel:

Damper label

Not all dampers open this way so find out which way yours is open and make a label to place on the underside of your mantel.

Damper clamps

If your firebox is plumbed for gas, either for gas logs or a log lighter for burning with wood, then the damper has to be locked in a fully-open position with a clamp. You will not be able to close your damper. This is required by code in most areas of the United States. In this case, you may consider glass doors on the front of the fireplace.


Open window with curtainsRemember, an open damper is the same as an open window. Would you leave a window open when your air conditioning or furnace is on? Then why would you leave your fireplace damper open?

Roof rats love your chimney!

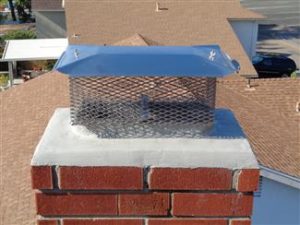
A chimney cap will prevent roof rats from entering a homeEven if homeowners don’t use their fireplace, there are still very important reasons to have a chimney cap.
This last week, as a chimney sweep, I received a record number of phone calls from people who had critters in their chimney.  This time of year here in San Diego, during the rainy season, it’s not uncommon to get these phone calls.  Critters are always looking for a dry, warm, dark place during the rain.

Here in San Diego, in many cases, these critters are roof rats. Once they get down the chimney, they land behind the damper in an area called the smoke shelf. Once they go down, it’s difficult if not impossible for them to find their way back up the chimney. If your damper is open, it’s easy for the roof rats to find their way into your home. Not good!

Birds are also a problem

In addition, this is about the time of year when birds are finding places to nest. If a bird gets in a chimney and builds a nest, it is illegal for any person to remove a bird or an active nest without a special wildlife permit, according to the Migratory Bird Treaty Act of 1918. You have to wait until the birds and chicks leave the nest permanently on their own or until the birds die. If the birds die inside the chimney, the smell is disgusting.  Even worse, the leftover nest carries dangerous diseases such as histoplasmosis.

As of March, 2020, here is a comprehensive list of 1,093 species of birds covered under this Act. This list even includes pigeons!

This Act is one of the oldest wildlife protection laws on the books.  According to the MBTA, “It is a misdemeanor to violate any provision of the Act with punishment of a maximum fine of $15,000 or imprisonment up to six months or both…” unless you have a special permit issued by the U.S. Fish & Wildlife Service.

The best way to prevent birds, and other critters, from coming into a chimney is with a chimney cap.

Four other very important reasons for a chimney cap

In addition to preventing critters from entering your home through the chimney, there are four other important reasons to install a chimney cap.

A chimney cap, because it has a spark arrestor mesh, prevents hot flying embers from landing on your roof, on your neighbor’s roof, in dry brush or on solar panels and cars.

Chimney CapA chimney cap with a solid lid on top will prevent most of the rain from entering the chimney. Over a long period of time, rain that enters the chimney will land in the smoke shelf and can then rust out a damper and deteriorate a chimney from the inside out.
A chimney cap prevents leaves and other debris from falling into the chimney from the top. Leaves and debris are a combustible material and can create a potential safety hazard in a chimney.

Downdrafts can create smoking problems. Installing a specially-designed windcap will prevent smoking problems caused by downdrafts.


If your chimney does not have a chimney cap, it’s a good idea to install one. Call a CSIA Certified Chimney Sweep today to install a chimney cap to prevent those “unwelcome visitors” from entering your home!

Chimney Caps and Termite Tents

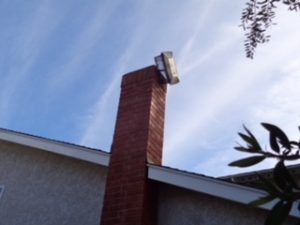
Chimney cap askew on top of a chimney
Photo credit: Rick Pocock

What do chimney caps and termite tents have in common? More than you think!

Several times a year, the strong Santa Ana winds hit Southern California. These winds are something we San Diegans dread because it usually brings with it the threat of wildfires. But there’s something else that occurs due to these forceful winds.

After the winds subside, I get numerous phone calls from customers who notice that their chimney caps have flown off and landed in their back yard. The first question I now ask: “Have you recently had your house tented for termites?” In every single case, the answer is always “Yes.”

What happens to Chimney Caps when your house is tented?

In our experience as chimney sweeps, we have experienced two scenarios:

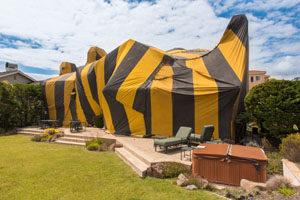
Scenario #1) The pest control company leaves the chimney cap on the chimney during the termite tenting. In this case, the full weight of the heavy tent is on the highest point of the house which, in many cases, is the chimney cap. The full weight of the termite tent will crush the cap. With a crushed cap, this creates a dangerous situation for the homeowner. Using your

A termite tent will crush chimney caps
Photo credit: Adobe Photos

fireplace with a crushed chimney cap will mean that the smoke, gases and carbon monoxide cannot vent. The hazard is especially dangerous when the homeowner has artificial gas logs where the gases are colorless and odorless. This is a potentially DEADLY situation.

Scenario #2) The pest control company removes the chimney cap and re-installs it after the termite tenting has been completed. There have even been cases where we’ve seen the cap was simply sitting on top of the chimney without even being attached in any way to the chimney. Unfortunately, many pest control companies do not know how to re-install the chimney cap properly and the first wind that comes up, the cap goes flying. Hopefully, the cap doesn’t land on your tile roof, solar panels, through your neighbor’s window, on a car, or even worse, on a person.

How to prevent problems with Chimney Caps

After your home is tented for termites, always have the chimney inspected by a chimney sweep certified through the Chimney Safety Institute of America (CSIA). A CSIA Certified Chimney Sweep will not only be able to ensure that the chimney hasn’t been damaged by the heavy termite tent but will also be able to verify that the chimney cap is installed properly.

Make sure a termite doesn’t affect the safety of your fireplace!

Problems with an Unlined Chimney

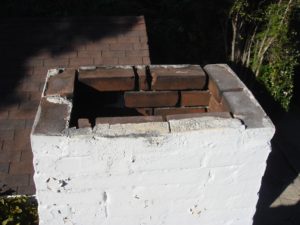
The top of an unlined chimneyAs a chimney sweep, the most important part of a chimney that we inspect is the flue lining. In many older homes, there is no flue lining. This type of chimney system is referred to as an unlined chimney. According to the Chimney Safety Institute of America, “Never use a chimney that does not have a liner…”
What is an unlined chimney?

Simply stated, an unlined chimney is a chimney without a flue lining. The flue lining is a pipe that can be made from terra cotta, pumice or stainless steel. The flue lining should go from the very top of the chimney down to the bottom, to the smoke chamber above the firebox.

Depending on the region of the United States where you live and what building codes were in place at the time the chimney was built, flue linings have been required since the early 1900’s. However, here in San Diego, we see unlined chimneys as late as the 1950’s. In the 2016 California Residential Code, Chapter 10 – R1003.11 it states specifically, “Masonry chimneys shall be lined.”

In the 1940’s and again in the 1980’s, the National Bureau of Standards performed tests on unlined chimneys. After testing for just 3½ hours, the woodwork adjacent to the unlined chimney caught on fire. The test was abandoned at that point because the unlined chimney failed to perform its function. The researchers concluded that “building a chimney without a lining was little less than criminal.”

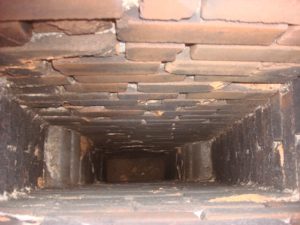
Interior of an unlined chimney
Looking down an unlined chimney, there is no flue lining

The mortar joints between the bricks in an unlined chimney also fail. Many masons in the early years of building unlined chimneys added a lot of sand to the mortar. The mortar is like the glue that holds the bricks together. As the mortar in the joints gets older and deteriorated, the mortar joints fail, becoming sand. This creates gaps and holes in the mortar joints inside the chimney. These gaps allow heat, gases (such as carbon monoxide) and embers to penetrate and transfer to surrounding combustibles such as the wooden infrastructure of the home.

Without a lining, an unlined chimney “can no longer contain the elements of combustion.” When we see unlined chimneys in our customer’s homes, we recommend not to use the chimney until the chimney has been repaired.

How do you know if you have an unlined chimney?

Perhaps you had a home inspection done when you purchased your home. What most home buyers don’t realize is that home inspectors do not inspect flue linings. You cannot depend on a home inspection to determine if your chimney is lined or unlined. This is why it is essential to get a separate chimney inspection by a CSIA Certified Chimney Sweep BEFORE you purchase a home. Here’s how to find a CSIA Certified Chimney Sweep.

A CSIA Certified Chimney Sweep will not only be able to determine if your chimney is lined or unlined, but will also be able to inspect the condition of the flue lining if you have one. Again, the flue lining is the most critical component of your entire chimney system.

How to repair an unlined chimney

Assuming the chimney is structurally sound, the chimney can be relined, although new methods may be found in various parts of the United States.

Relining a chimney is where a metal pipe is installed inside the chimney structure to become the new flue lining. In most cases with these older systems, the firebox is rebuilt at the same time. Typically a top-mount damper is installed along with a flue cap.

Prices for relines vary from region to region. Chimneys in poor condition may also require additional extensive repair before relining.

If the unlined chimney is not structurally sound, a reline may not be a consideration. In that case, tearing down the chimney and rebuilding it with either a new masonry chimney or installing a prefab system would be the only other option.


First things first, have your chimney flue lining inspected by a CSIA Certified Chimney Sweep to make sure you don’t have an unlined chimney!

[Photo credits: Rick Pocock]

What is a Masonry Chimney?

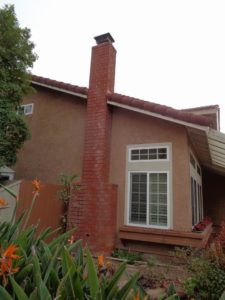
A masonry chimney on the exterior wall of a home

Just like automobiles that have different manufacturers and models, the same goes for fireplaces and chimneys.

Here in Southern California, there are primarily three different types of open fireplace systems–1) masonry chimneys; 2) prefabricated, factory-built systems; and 3) Rampart General Pre-Cast systems. Since I’ve already addressed Rampart General Pre-Cast systems in the past, this post will be about the masonry chimney.

The History of the Masonry Chimney

These masonry systems have been around for many centuries and are tried and true. They are constructed on-site with bricks, stone, concrete blocks and mortar. Masonry systems are built by hand, brick by brick. If the system is built properly and maintained regularly and there are no extenuating events (such as earthquakes and wildfires), they will last a century or more. In fact, it’s not uncommon to see masonry chimneys still in use in houses built in the 18th and 19th centuries.

Unfortunately, due to the high cost of labor, these systems haven’t been constructed since the mid-1980s here in Southern California except for in high-end, custom-built homes.

For a fireplace to work properly, there is a formula involved in building a masonry chimney system. Some of the factors in this formula have to do with the height of the chimney, the diameter of the flue pipe, and the height/width of the firebox opening. If a system isn’t built properly, the chimney will never draw properly and will have ongoing smoking problems.

Components of a Masonry Chimney and Fireplace

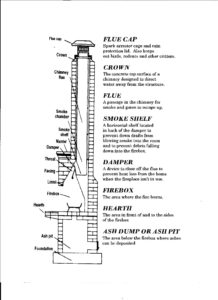
It’s important to know the various components of a masonry chimney:

Flue cap – The chimney cap consists of spark arrestor material with a solid lid. It provides three primary benefits: 1) It prevents embers from getting on the roof; 2) It prevents birds, rodents and other critters from entering the home through the chimney; and 3) Flue caps with solid lids will also prevent most of the rain from coming down the flue lining. Without the solid flat lid of the cap, rain would land in the smoke shelf which may cause damage to the damper and may deteriorate the firebox.

Crown – The crown is a concrete or mortar surface at the very top of the chimney structure. Its purpose is to direct water Masonry chimney componentsaway from the structure. A crown can also be referred to as a “wash” or a “splay.” A cracked crown will allow moisture to get into the chimney structure, eventually creating cracks in the chimney structure.

Flue – The flue is the passageway from the firebox to the top of the chimney structure. In a masonry chimney, the flue is lined with a flue lining typically made from terra cotta, pumice or metal.

If the flue lining is cracked, broken or if the mortar joints are missing between the flue tiles, the system cannot be used because of heat transference or deadly carbon monoxide leaking into the house. There are three primary methods for repairing cracked flue linings–1) relining the system with a stainless steel pipe; 2) installing a stove insert with a metal pipe to the top of the chimney structure; or 3) a poured cement, cast-in-place system.

In addition, older systems may not have a flue lining at all (which is referred to as an “Unlined Chimney”). In this case, the system cannot be used until it has been repaired.

Flue tiles – A flue lining inside a flue is basically a vent pipe. This pipe is not one solid pipe. In most cases, the pipe (typically terra cotta or pumice) is made up of pipe sections called flue tiles. Each flue tile (pipe section) is anywhere from 12″ to 24″ tall. In between each flue tile is the mortar. There should not be any gaps or voids in the mortar joints.

Smoke Shelf – A horizontal shelf located behind the damper to prevent down drafts and to collect debris that has fallen down the chimney.

Damper – The device that opens and closes so that heat is not lost from the home when the fireplace is not in use. Some dampers can be installed at the top of the chimney flue.

Lintel – A horizontal metal piece that extends over the entire width of the firebox opening at the top of the firebox opening. It is a structural part of the firebox. Here’s important information on why you never want to remove a lintel.

Firebox – The area of the fireplace where the fire is burned.

Exterior Hearth Extension – The area that extends in front of and to the sides of the firebox opening. The exterior hearth extension should be made from non-combustible materials and should be differentiated from the rest of the room’s flooring.

Ash Dump – Not all masonry systems have an ash dump. This is the area below the firebox where the ashes can be swept down into. A firebox with an ash dump will typically have a metal plate in the firebox’s floor. This metal plate can be opened to brush the ashes below.

Clean-out Door: The clean-out door is located on the outside of the chimney structure near ground level to clean out the ashes from the ash dump.

Unlined Masonry Chimney

Before the early 1900s, masonry systems were not constructed with a flue lining. We refer to those systems as “Unlined Chimneys.” According to the Chimney Safety Institute of America, “Never use a chimney that does not have a liner or has a damaged or improper lining.” [Public Safety Bulletin issued by the Chimney Institute of America: The Importance of Flue Lining in Your Masonry Chimney.] Here in San Diego, however, we have seen unlined chimneys as late as the early 1960s.

When these unlined systems were originally built, the masons used a material called parging (like stucco). They hand-coated over the bricks and mortar joints inside the chimney flue. With time, age and usage, this parging material has worn away, leaving the bricks and mortar joints exposed. In addition, back then the masons used a lot of sand in their mortar. Eventually, these mortar joints disintegrate, leaving gaps and voids. This creates a potentially dangerous situation.

If the unlined chimney is structurally sound and there are no other issues with the system, the system can be “relined.” This is a method where a stainless steel pipe is installed inside the chimney structure. However, if the metal lining is not installed properly or is undersized, the fireplace can be dangerous and/or will not ever draw properly.  Relining a chimney should only be done by a licensed and qualified chimney professional.

Make sure to use a CSIA Certified Chimney Sweep to inspect your system and sweep it if needed. If your masonry chimney is maintained, it will give you warmth and comfort for many years, decades and maybe even centuries to come.


Caveat: Chimneys are built differently in various regions throughout the country. What is common in one region may not be common in another. This information provided here is based on what we see in Southern California.